I had to share this video. I saw it on seriouseats and it spoke to my soul. The food critic from CG take Eric Ripet to Costco and they make a fabulous and elegant meal from their shopping trip. While Eric says that Costco lacks soul, he commends its high quality and value. Heck, who needs to cook for hours for Thanksgiving when you can just get everything from Costco?! Well, I at least bought most of my ingredients from there. :)
Happy Thanksgiving, everyone!
Wednesday, November 25, 2009
Monday, July 27, 2009
Kitchen Sink Dinner Frittata
Dear ones. I'm so bad at visuals and at remembering to blog. You'll have to forgive me. But I thought I'd pass along my weeknight default dinner when I need to use up veggies that have kind of passed the point of being crisp enough for salad. It works perfectly well for guests or yourself. I wrote the recipe in terms of per-serving because you can make anywhere between 1 and like 6 servings using the same methodology. Just plan on a longer baking time for cooking six servings. The frittata can be served hot or at room temp. Left overs store well in the fridge for several days and are great for taking to work for lunch.
Ingredients:
· 1 strip bacon or sliced poultry sausage per serving (optional)
· 2 eggs per serving
· 1/2 cup veggies per serving (onions, peppers, squash, broccoli, mushrooms, greens are great too, but if using greens that will wilt do like a cup per serving at least and make sure you cook the liquid out.
· 1 tsp chopped fresh or ¼ tsp dried herbs per serving
· 1/8 C dairy (milk, half-and-half, plain yogurt) per serving
· 1 tbs shredded or soft cheese per serving (optional)
Non-negotiable Tools:
Non-stick or cast iron pan with a lid (or foil)
1. Heat oven to 425
2. Over medium heat cook bacon. If using pre-cooked bacon strips, heat it up enough to crisp the bacon and get the fat out.
a. While bacon cooks, use a fork or whisk to combine eggs, dairy, herbs and salt/pepper
b. Chop all veggies to about the same size
3. Remove bacon strips from pan and lay on paper towels to drain.
4. Pour out and discard most of bacon fat, reserving enough in the pan to cook your pile of veggies. Use your judgment on how much you need.
5. Sauté veggies, beginning always with aromatics (onions, garlic, spicy peppers). Carmelize these first. Then add veggies in order of water content. (Mushrooms, greens, peppers, etc). It’s not the end of the world if you guess wrong on water content, but they’ll just flavor up better that way. If things start to burn, add a little water or chicken stock. (NB: If you’re not using bacon, cook veggies in a combination of equal parts butter and low-flavor oil like canola oil).
6. When veggies are cooked, add a little bit more fat to the pan (oil, butter, bacon fat – whatever). Pour in egg mixture and turn heat down to medium-low. Don’t touch the mixture. Cover with a lid and let cook 5 min.
7. After 5 or so min you will see the edges of the egg mixture start to look “dry” or “set.” Sprinkle crumbled bacon and cheese over the top of the mixture.
8. Cover and put in middle rack of oven for 15-30 min. Maybe longer for like 12 eggs. Probably closer to an hour for that one.
9. To test if the frittata is done, take pan out of the over and touch the middle of the omelet with your finger. It should kinda spring back.
10. Allow to cool 10 min. Then run a heat-safe spatula around the rim and invert the whole thing on a plate.
11. Serve in wedges.
Sunday, April 26, 2009
Cranberry-Pistachio Biscotti

Before I became obsessed with the food network, cookbooks, and all things culinary, Costco served as my "matchmaker" to a world of fabulous food. Case in point - biscotti. My first encounter with biscotti happened when Costco began selling Nonnis Biscotti - hard, nut-studded, chocolate covered spears of baked goodness individually packaged and sold in large plastic tubs. I would swirl my white chocolate covered biscotti into a Winnie-the-Pooh mug of hot chocolate before going to bed. Between my big sister and I (who LOVED them), my mother couldn't keep enough of these cookies around!
While my love affair with Costco continues, I haven't bought a tub of Nonni's Biscotti in ages - out of fear that I'll devour then all. I've read a gazillion biscotti recipes and always had intentions to make them. But for some reason or another, I never made them until last night.
This recipe is adapted from the Almond Biscotti recipe in the America's Test Kitchen Family Baking Book. I substituted pistachios and added cranberries to the batter. The only thing I can think of making them better - dipping them in white chocolate. But I'll save that step from when my sister comes over. And may I also add, these are the perfect companion to your afternoon cappuccino (delightfully made in my Mukka Express).
***
Cranberry Pistachio Biscotti
2 cups (10 ounces) all-purpose flour
1 teaspoon baking powder
1/4 teaspoon salt
4 tablespoons (1/2 stick) unsalted butter, softened
1 cup (7 ounces) sugar
2 large eggs
3/4 teaspoon vanilla extract
3/4 cups (3 3/4 ounces) pistachios, chopped coarse
3/4 cups dried cranberries
2 tablespoons grated fresh orange zest
- Adjust an oven rack to the middle position and heat the oven to 350 degrees. Line a large baking sheet with parchment paper. Whisk the flour, baking powder, and salt together in a medium bowl.
- In a large bowl, beat the butter and sugar together using an electric mixer on medium speed until light and fluffy, 3 to 6 minutes. Beat in the eggs, one at a time, then the vanilla extract until combined, about 30 seconds, scraping down the bowl and beaters as needed.
- Reduce the mixer speed to low and slowly mix in the flour mixture until combined, about 30 seconds. Mix in the pistachios, cranberries, and zest until just incorporated.
- Press the dough into two 13 by 2-inch loaves on the prepared baking sheet, spaced about 3 inches apart. Bake the loaves until golden and just beginning to crack on top, about 35 minutes, rotating the baking sheet halfway through baking.
- Let the loaves cool on the baking sheet for 10 minutes. Lower the oven temperature to 325 degrees.
- Transfer the loaves to a cutting board and slice each on the diagonal to 1/2 inch thick slices with a serrated knife. Lay the slices about 1/2 inch apart on the baking sheet and bake until crisp and golden brown on both sides, about 15 minutes, flipping the slices over halfway through baking. Transfer the biscotti to a wire rack and let cool completely before serving, about 1 hour.
Wednesday, February 25, 2009
It's a small world after all...
Especially in the Lower East Side.
Today is Ash Wednesday, and starting since 12:00 am, I have been and will be completely alcohol free until Easter. Last year I gave up all carbonated beverages and that was pretty hard. This year I decided that it would be interesting to give up alcohol...I would save money, calories and perhaps lower my ridiculous tolerance??
So of course I had to celebrate Fat Tuesday in honor of my impending sobriety. And what better way than going to the Clinton Street Baking Company, for dinner, where not only is every Tuesdays half-price wine night, but yesterday was also International Pancake Day of their Pancake month....and did I mention they are known for their incredible pancakes?
I went with my lovely co-worker Emily and had a ridiculously amazing meal where we split a bottle of wine and talked, and talked, and talked, and talked (did I mention we were catching up). Emily ordered the special creamy artichoke soup, which was incredibly decadent and creamy, and the fish and chips for her entree (which she stated were incredible, and which obviously I did not try being a hater of all things that live in the water).
Being squash obsessed, I on the other han, ordered the spicy butternut squash soup as my appetizer - it was perfectly seasoned and filled with butternut goodness, and unlike other butternut squash soups not cloyingly sweet. For my entree, I had their black angus burger with caramelized onions on a brioche bun. Heaven.
But where were the pancakes you say? Well being of like minded ladies, Emily and I agreed hours before we even left work that we would split the pancake of the day - roasted apples & pears with cinnamon sour cream - for dessert; we also decided to split (we did just split a bottle of wine....ok Emily was getting drunk, I wasn't even tipsy

And of course, lest I forget, who do I see walk in the middle of dinner but none other than fellow Morsel Stephanie B., er C. Being of like minded International Pancake knowledge, she was also there for dinner with her delightful husband.
Overall, not a bad way to start my dry 40 days.....
Sunday, February 22, 2009
Homemade Ricotta and Asparagus, Ricotta, & Prosciutto Pizza
Today I made ricotta cheese! This is not something I would normally think of doing, but I'm housesitting for my parents and have a big, well-stocked kitchen at my disposal, so... decided to have some fun trying new things!

The ricotta was delicious, and it was SO EASY to make. I followed this ricotta recipe from eggsonsunday.com, which has very clear step-by-step instructions that I won't repeat here. I used 1% milk, and that turned out just fine. The hardest part for me was just stretching the cheesecloth over the collander. (Which is to say, it was all quite easy.)

I would definitely make ricotta again, rather than buy it. So quick and so yummy.
This evening I put some of the ricotta to use on a pizza, also inspired by a recipe from eggsonsunday. Made some slight changes, though - here's my pizza recipe:
****
Asparagus, Ricotta, & Prosciutto Pizza
1 lb pizza dough (I buy dough in a bag from Trader Joe's)
1 T olive oil
salt
pepper
1 cup ricotta
1/4 cup mozzarella
6 spears asparagus
about 3 oz. of prosciutto
Preheat oven to 500 and put a pan in to heat. (Or use a pizza stone if you have one - I don't.)
Cut the asparagus into pieces about an inch or two long, steam the pieces for 2 minutes, and immediately put them in a bowl of cold water to stop the cooking.
Sprinkle cornmeal on a piece of parchment. Use your hands (coated with lots of flour) to spread the dough on the parchment. Sprinkle dough with a bit of olive oil, coarse salt and ground pepper. Scatter pieces of ricotta and mozzarella as a first layer, sprinkle on a little more salt and pepper, then top with asparagus and torn pieces of prosciutto. Transfer the pizza (on the parchment) to the hot baking sheet in the oven and cook for 8 to 10 minutes, until the crust is nicely browned.

I also made lemon curd this afternoon, which was fantastic, but that will have to wait for another post. :)
Monday, February 16, 2009
Everything is better with Guinness

I know, I know. I never write. I never call. I never post. I would blame it on my job (the end of and be all of excuses for all of the things I don't do), but I'm not quite as busy now that the sky has fallen on the economy. I have the opportunities and sometimes the camera handy for things to blog. But I'm lazy
One of my co-workers introduced me to the Smitten Kitchen blog, which I have quickly become obsessed with, and on it I found a chocolate ganached cake made with Guinness that I desperately had to have an excuse to make because chocolate +Guinness = awesome. So desperate and


It was super easy to make and really quick....I managed to do it quite hungover from a wedding day before....and more importantly it turned out amazing. It was moist, and filled with chocolate goodness that everyone loved. The recipe can be found here (I'm just strangely awake, not any less lazy).


Wednesday, January 28, 2009
Chuc Mung Nam Moi - Happy Lunar New Year!
Growing up, the Lunar New Year was always a time when my entire extended family got together, ate until we could eat no longer, and gambled until the same came up. And this year was no exception. My mom was cooking for days both the traditional fare we grew up with and some additional vegan dishes for my grandparents. Here are just a few photos from the party.
Here is Banh Trung (also called Banh Tet a/k/a Lunar New Year Cake). It the middle is pork and mung beans surrounded by sticky rice. The entire thing is then wrapped in banana leaves. The legend behind the cake goes kindove like this...
 A long time ago, a king ruled Vietnam who was loved by his people. One day, he realiezd that he was getting old and could not rule the country forever. However, he had three sons and did not know which one to pass the throne to. He called his three sons together and declared: "My sons, all of you are wise and good. However, only one of you can be king. To determine which son will be king, I have devised a contest. Go out and make me a dish of food. You will present me this dish on the last day of the Lunar New Year. The son with the best dish shall become king."
The eldest son immediately went to South China Sea and caught the most rare fish. The middle son trekked up the Khmer Mountains in seach of the most tender boar meat. The youngest son went back home and pondered his father's challenge.
On the last day of the new year, all three sons returned to their father's court. The eldest son presented to his father a beautiful porcelain dish of flying fish dressed in sweet chili sauce and accompanied by expensive lotus seeds. The second brother came forward and presented a copper pot with a wild boar roast and wild mushrooms. Finally, the youngest brother came before his father and showed him a basket with a flat rice cake.
The king looked perplexed and asked his youngest son, why do you bring me such a plain dish? The son answered: rice is the most precious and valuable of all food found in this Kingdom, yet it is also the most abundant. I have prepared a dish that represents my love for you and our beautiful Vietnam. I have shaped in a round to represent the sky. I called it Banh Day. I have stuffed another with cooked bean paste and meat in the middle. I have shaped this one in a square. This symbolies the earth we live on.
The father and the other brothers instantly knew that the youngest brother was more wise than all of them and that he would be king. And that is why every Lunar New Year (a/k/a Tet), we eat Banh Day and Banh Trung!

In the back of this photo are Vietnamese Spring Rolls (Goi Cuon) and in the front are slices of Banh Trung. Anyways, since this is food blog and I really should post some recipes (it's been awhile), here's the recipe for Goi Cuon (Vietnamese Spring Rolls). We don't make the Banh Trung; I just buy it. =)
****
Goi Cuon (Vietnamese Spring Rolls a/k/a Rice Paper Rolls)
Makes 8 rolls; serves 4
2 ounces thin rice vermicelli
8 raw medium shrimp
12 ounces pork belly or boneless pork loin, in one piece
8 rounds of rice paper (banh trang)
4 large lettuce leaves, thick stem ends removed and cut in half
1/2 cup mint leaves
1/2 cup cilantro leaves
1. Get all of the different components ready:
2. Work with 1 sheet of rice paper at a time. Immerse each sheet individually into the warm water. Quickly remove and spread out onto a plate or dry towel. The rice paper will become pliable within seconds. NOTE: it is very important that you do NOT leave the rice paper in the water for very long. Literally moisten it and get it out.
3. Lay one piece of lettuce over the bottom third of the rice paper.

4. On the lettuce, place about 1 tablespoon of noodles, a few pieces of pork, mint leaves, and cilantro sprigs (if desired).

5. Roll up the paper halfway into a log. Fold both sides of the paper over the filling. lay 2 shrimp halves, cut side down, along the crease. Keep rolling the paper into a log to seal.

6. Serve with peanut sauce (see recipe below)...wow, this is getting to be a very long post...
Peanut Sauce
Yields about 3/4 cup
1/4 cup hoisin sauce
1/4 cup chicken broth or water, hot
1 tablespoon fish sauce (nuoc mam)
2 tablespoons peanut butter
1 fresh red chile pepper, seeded and thinly sliced
Combine all ingredients into a small bowl. Stir well to blend.
Here is Banh Trung (also called Banh Tet a/k/a Lunar New Year Cake). It the middle is pork and mung beans surrounded by sticky rice. The entire thing is then wrapped in banana leaves. The legend behind the cake goes kindove like this...
 A long time ago, a king ruled Vietnam who was loved by his people. One day, he realiezd that he was getting old and could not rule the country forever. However, he had three sons and did not know which one to pass the throne to. He called his three sons together and declared: "My sons, all of you are wise and good. However, only one of you can be king. To determine which son will be king, I have devised a contest. Go out and make me a dish of food. You will present me this dish on the last day of the Lunar New Year. The son with the best dish shall become king."
The eldest son immediately went to South China Sea and caught the most rare fish. The middle son trekked up the Khmer Mountains in seach of the most tender boar meat. The youngest son went back home and pondered his father's challenge.
On the last day of the new year, all three sons returned to their father's court. The eldest son presented to his father a beautiful porcelain dish of flying fish dressed in sweet chili sauce and accompanied by expensive lotus seeds. The second brother came forward and presented a copper pot with a wild boar roast and wild mushrooms. Finally, the youngest brother came before his father and showed him a basket with a flat rice cake.
The king looked perplexed and asked his youngest son, why do you bring me such a plain dish? The son answered: rice is the most precious and valuable of all food found in this Kingdom, yet it is also the most abundant. I have prepared a dish that represents my love for you and our beautiful Vietnam. I have shaped in a round to represent the sky. I called it Banh Day. I have stuffed another with cooked bean paste and meat in the middle. I have shaped this one in a square. This symbolies the earth we live on.
The father and the other brothers instantly knew that the youngest brother was more wise than all of them and that he would be king. And that is why every Lunar New Year (a/k/a Tet), we eat Banh Day and Banh Trung!

In the back of this photo are Vietnamese Spring Rolls (Goi Cuon) and in the front are slices of Banh Trung. Anyways, since this is food blog and I really should post some recipes (it's been awhile), here's the recipe for Goi Cuon (Vietnamese Spring Rolls). We don't make the Banh Trung; I just buy it. =)
****
Goi Cuon (Vietnamese Spring Rolls a/k/a Rice Paper Rolls)
Makes 8 rolls; serves 4
2 ounces thin rice vermicelli
8 raw medium shrimp
12 ounces pork belly or boneless pork loin, in one piece
8 rounds of rice paper (banh trang)
4 large lettuce leaves, thick stem ends removed and cut in half
1/2 cup mint leaves
1/2 cup cilantro leaves
1. Get all of the different components ready:
- Boil the shrimp for 3 minutes. Refresh under cold water. Shell, de-vein, and cut lengthwise in half. Set aside.
- Cook the pork belly in boiling salted water for 20 minutes. Thinly slice.
- Have a basin or bowl or warm water ready to moisten the rice papers.

2. Work with 1 sheet of rice paper at a time. Immerse each sheet individually into the warm water. Quickly remove and spread out onto a plate or dry towel. The rice paper will become pliable within seconds. NOTE: it is very important that you do NOT leave the rice paper in the water for very long. Literally moisten it and get it out.
3. Lay one piece of lettuce over the bottom third of the rice paper.

4. On the lettuce, place about 1 tablespoon of noodles, a few pieces of pork, mint leaves, and cilantro sprigs (if desired).

5. Roll up the paper halfway into a log. Fold both sides of the paper over the filling. lay 2 shrimp halves, cut side down, along the crease. Keep rolling the paper into a log to seal.

6. Serve with peanut sauce (see recipe below)...wow, this is getting to be a very long post...
Peanut Sauce
Yields about 3/4 cup
1/4 cup hoisin sauce
1/4 cup chicken broth or water, hot
1 tablespoon fish sauce (nuoc mam)
2 tablespoons peanut butter
1 fresh red chile pepper, seeded and thinly sliced
Combine all ingredients into a small bowl. Stir well to blend.
Monday, January 26, 2009
Happy Year of the Ox!
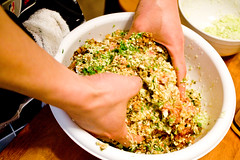
A few weeks ago, Henry and I made a million potstickers.
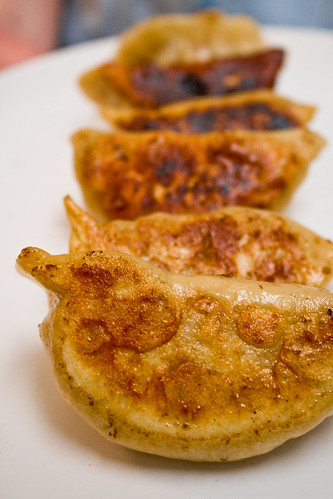
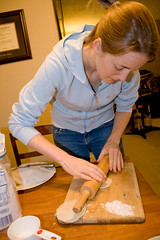
With the help of a food processor, it’s not hard to make the filling for a million potstickers fairly quickly.
What’s hard is rolling out each. individual. wrapper. (me.) And then wrapping each potsticker. (Henry.)
Here’s the story of the million potstickers.
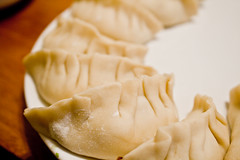
We started with this excellent recipe from Jen Yu of userealbutter.com (highly recommended blog – more of her recipes to come). We made approximately a double batch of filling and a double batch of wrappers.

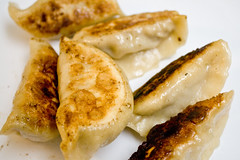
The wrappers lasted us through about half of the filling. Half! I don’t think we were rolling them very thick or anything. Seemed quite thin to me. So anyway, then we made another single batch of the dough. (I’m not sure why that seemed like a sensible idea to me, given that a double batch only got us HALFway through the filling.) When those ran out we gave up, threw everything in the fridge, and collapsed. The next day we bought pre-made wrappers and finished off most of the filling. (The bit of filling that was left at that point got pitched into the garbage and good riddance.) Result of this experiment: we couldn’t taste the difference between the homemade and the storebought wrappers. Buy them!
But truly, even with the homemade wrappers, these potstickers were a lot of fun to make, and delicious to eat! The recipe for a tasty dipping sauce is also included below. Henry and I ate these potstickers at 4 or 5 meals over the course of 4 days, and we also served them as an appetizer when his co-clerks came over for dinner. So yummy! I’m craving them now!
****
Potstickers, adapted from Chinese Dumplings and Potstickers on userealbutter.com.
(This is the doubled version of the recipe, which made a million (aka about 100) potstickers)
Filling:
2 lbs ground pork
8 cabbage leaves (I’m sure napa cabbage is best, we just had normal old cabbage)
6 green onions
12 shitake mushrooms
¼ cup ginger, minced
4 eggs
½ cup soy sauce
¼ cup sesame oil
¼ cup cornstarch
about a palmful of salt (to taste)
fresh ground pepper
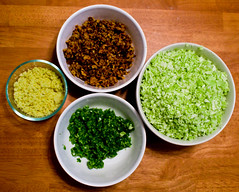
Instructions:
Use a food processor to chop the following ingredients, separately: cabbage, green onions, mushrooms, and ginger. Put these chopped ingredients in a large bowl, add ground pork, soy sauce, sesame oil, cornstarch, salt, and eggs. Use spoons or your hands to mix everything together until all is uniformly distributed.
(After you’ve wrapped a couple of potstickers, cook them up and taste. You may want to add more salt or soy sauce. If the filling is not sticking together well, add more egg.)
Dipping sauce:
1 green onion
2 cloves garlic
a small chunk of ginger
soy sauce
sesame oil
garlic chili sauce or chili oil (optional)
Instructions:
Finely chop the green onion, garlic, and ginger. In a small dish, combine with soy sauce, plus a splash of sesame oil. This just gets better over time, as the flavors mix. For a little kick, add a bit of chili sauce/oil.
Wrappers, how to wrap, and how to pan-fry:
See recipe and instructions on userealbutter.com. The recipe/instructions are way down at the end of the post, but then you’ll want to scroll back up to see pictures of how to roll and wrap the potstickers. For this part, the only adjustment we suggest is that you BUY 100 PRE-MADE WRAPPERS. But if you decide to make them at home, follow the userealbutter recipe, except quadruple it and mix a few pinches of salt in with the flour before you start adding water. We have only tried dough Method 2, and that worked great.
Other important notes:
After wrapping, be sure to dredge the bottom of the potsticker in flour. Otherwise, even if it doesn’t seem sticky now, it will become sticky later and you will have a hard time getting it off the plate and into the pan (especially if you store the plate in the fridge for any length of time). Also, don’t let the sides of the potstickers touch each other while uncooked, unless you also flour the sides.
We continued eating potstickers over several days, as I mentioned, and we just kept the uncooked ones in the fridge for those days. If you’re going to store them longer, freeze on the plate (well floured and carefully separated!) and then dump into a bag to store in the freezer.
(Thanks for the pictures, Henry!)
With the help of a food processor, it’s not hard to make the filling for a million potstickers fairly quickly.
What’s hard is rolling out each. individual. wrapper. (me.) And then wrapping each potsticker. (Henry.)
Here’s the story of the million potstickers.
We started with this excellent recipe from Jen Yu of userealbutter.com (highly recommended blog – more of her recipes to come). We made approximately a double batch of filling and a double batch of wrappers.
The wrappers lasted us through about half of the filling. Half! I don’t think we were rolling them very thick or anything. Seemed quite thin to me. So anyway, then we made another single batch of the dough. (I’m not sure why that seemed like a sensible idea to me, given that a double batch only got us HALFway through the filling.) When those ran out we gave up, threw everything in the fridge, and collapsed. The next day we bought pre-made wrappers and finished off most of the filling. (The bit of filling that was left at that point got pitched into the garbage and good riddance.) Result of this experiment: we couldn’t taste the difference between the homemade and the storebought wrappers. Buy them!
But truly, even with the homemade wrappers, these potstickers were a lot of fun to make, and delicious to eat! The recipe for a tasty dipping sauce is also included below. Henry and I ate these potstickers at 4 or 5 meals over the course of 4 days, and we also served them as an appetizer when his co-clerks came over for dinner. So yummy! I’m craving them now!
****
Potstickers, adapted from Chinese Dumplings and Potstickers on userealbutter.com.
(This is the doubled version of the recipe, which made a million (aka about 100) potstickers)
Filling:
2 lbs ground pork
8 cabbage leaves (I’m sure napa cabbage is best, we just had normal old cabbage)
6 green onions
12 shitake mushrooms
¼ cup ginger, minced
4 eggs
½ cup soy sauce
¼ cup sesame oil
¼ cup cornstarch
about a palmful of salt (to taste)
fresh ground pepper
Instructions:
Use a food processor to chop the following ingredients, separately: cabbage, green onions, mushrooms, and ginger. Put these chopped ingredients in a large bowl, add ground pork, soy sauce, sesame oil, cornstarch, salt, and eggs. Use spoons or your hands to mix everything together until all is uniformly distributed.
(After you’ve wrapped a couple of potstickers, cook them up and taste. You may want to add more salt or soy sauce. If the filling is not sticking together well, add more egg.)
Dipping sauce:
1 green onion
2 cloves garlic
a small chunk of ginger
soy sauce
sesame oil
garlic chili sauce or chili oil (optional)
Instructions:
Finely chop the green onion, garlic, and ginger. In a small dish, combine with soy sauce, plus a splash of sesame oil. This just gets better over time, as the flavors mix. For a little kick, add a bit of chili sauce/oil.
Wrappers, how to wrap, and how to pan-fry:
See recipe and instructions on userealbutter.com. The recipe/instructions are way down at the end of the post, but then you’ll want to scroll back up to see pictures of how to roll and wrap the potstickers. For this part, the only adjustment we suggest is that you BUY 100 PRE-MADE WRAPPERS. But if you decide to make them at home, follow the userealbutter recipe, except quadruple it and mix a few pinches of salt in with the flour before you start adding water. We have only tried dough Method 2, and that worked great.
Other important notes:
After wrapping, be sure to dredge the bottom of the potsticker in flour. Otherwise, even if it doesn’t seem sticky now, it will become sticky later and you will have a hard time getting it off the plate and into the pan (especially if you store the plate in the fridge for any length of time). Also, don’t let the sides of the potstickers touch each other while uncooked, unless you also flour the sides.
We continued eating potstickers over several days, as I mentioned, and we just kept the uncooked ones in the fridge for those days. If you’re going to store them longer, freeze on the plate (well floured and carefully separated!) and then dump into a bag to store in the freezer.
(Thanks for the pictures, Henry!)
Subscribe to:
Posts (Atom)